In this post I show how you can implement Gherkin tests for Spring Boot 1.4.1. Here is an example of a Gherkin based test script:

The Feature, Scenario, Scenario Outline, Given, When, Then and And constructs are part of the Gherkin test language [1]. Such tests are popular in Behavior-driven development (BDD) and is meant as a common tool between users from the business and users from the development team [2].
The idea is that you can execute such a Gherkin script and get a test result (did it work or not?)
Notice the Gherkin language, there is nothing that prevents you from writing such tests even before the real business code exists. In fact it is a BDD best practice to write the tests before the feature gets implemented:
Imagine if you and the business wrote Gherkin tests as part of a User Story's acceptance criteria...
I haven’t done this yet. But I bet there are a lot of BDD practitioners that have.
About the Spring Boot 1.4 example
I have prepared a Spring Boot 1.4.1 based example on GitHub. Consult that to see the code in its entirety and true surroundings. The example consists of:
- The Gherkin test script you saw at the beginning of this post: It’s a script that tests a ”greetings” RESTful(ish) resource.
- The greetings resource: A super simple Spring MVC
@RestControllerthat accepts a caller name as input and emits a greeting message as output. This is the resource being tested.
I have used a 5 step recipe for making this work….
Step 1 of 5: Configure the build script
The example uses Gradle as it’s build technology. The Gherkin test support comes via the Cucumber-JVM test framework [3] and the Gradle Cucumber Plugin [4]. Here’s the Gradle script:
buildscript {
    repositories {
        mavenCentral()
        // So that the Gradle Cucumber Plugin can be downloaded:
        maven { url "https://plugins.gradle.org/m2/" }
    }
    dependencies {
        classpath("org.springframework.boot:spring-boot-gradle-plugin:1.4.1.RELEASE")
        classpath("com.github.samueltbrown:gradle-cucumber-plugin:0.9")
    }
}

apply plugin: 'java'
apply plugin: 'spring-boot'
// So that the Gradle Cucumber Plugin gets activated:
apply plugin: 'com.github.samueltbrown.cucumber'

sourceCompatibility = 1.8
targetCompatibility = 1.8

repositories {
    mavenCentral()
}

dependencies {
    compile 'org.springframework.boot:spring-boot-starter-web'
    testCompile 'org.springframework.boot:spring-boot-starter-test'
    // So that you can use the cucumber API's for your step implementations:
    cucumberCompile 'info.cukes:cucumber-java:1.2.5'
    cucumberCompile 'info.cukes:cucumber-junit:1.2.5'
    cucumberCompile 'info.cukes:cucumber-spring:1.2.5'
}

cucumber {
    // So that you can generate some pretty (...) reports:
    formats = ['pretty', 'json:build/cucumber/cucumber.json', 'junit:build/cucumber/cucumber.xml', 'html:build/cucumber/html']

    // So that you can run all features/scenarios except for those annotated with @Ignore:
    tags = ['~@Ignore']
}
Notice the comments in the buildscript. They highlight what parts of the Gradle script are particularly interesting.
By using the Gradle Cucumber Plugin you now have the support for a new source folder structure:
src/cucumber
|--- java
|--- resources
You put the Gherkin step implementations in the src/cucumber/java directory and the Gherkin scripts under the src/cucumber/resources directory.
Step 2 of 5: Write the Gherkin tests
The Gherkin tests are written in a .feature file. In the example I put the following contents into src/cucumber/resources/greetingsResource.feature:

This script contains 3 test scenarios.
The two first tests are based on the Scenario Outline and uses data from the Examples block. First column is the input we send to the greetings resource. Second and third columns are the expected outputs given that input. So: If we send in Duke to the greetings resource then we expect an HTTP status code 200 and a body with the message Hello World, Duke.
The third test is a Scenario that is not based on example input data. This test is just for fun 😉 [5].
In the real world you would cover error conditions as well. So if you are testing a RESTful resource, like in this example, you would test for client errors 4xx etc.
Step 3 of 5: Implement the Gherkin steps test code
Here’s the step implementations for the Gherkin script:
1
2
3
4
5
6
7
8
9
10
11
12
13
14
15
16
17
18
19
20
21
22
23
24
25
26
27
28
29
30
31
32
33
@SpringBootTest(webEnvironment = SpringBootTest.WebEnvironment.RANDOM_PORT)
@ContextConfiguration // Don't ask
public class GreetingsResourceSteps {

  @Autowired
  private TestRestTemplate restTemplate;

  private String caller; // input

  private ResponseEntity<String> response; // output

  @Given("I use the caller (.*)")
  public void useCaller(String caller) {
    this.caller = caller;
  }

  @When("I request a greeting")
  public void requestGreeting() {
    response = restTemplate
        .exchange("/greetings/{caller}", HttpMethod.GET, null, String.class, caller);
  }

  @Then("I should get a response with HTTP status code (.*)")
  public void shouldGetResponseWithHttpStatusCode(int statusCode) {
    assertThat(response.getStatusCodeValue()).isEqualTo(statusCode);
  }

  @And("The response should contain the message (.*)")
  public void theResponseShouldContainTheMessage(String message) {
    assertThat(response.getBody()).isEqualTo(message);
  }

}
Take a look at the class definition: this is where we tell the cucumber test framework to kickstart the Spring container. In fact it’s just like you would do in a typical Spring Boot 1.4 integration test: using the @SpringBootTest annotation. Said in another way: The Spring ApplicationContext will be launched prior to executing the Gherkin test scenarios.
Now take a look at lines 5+6: Here we inject Springs TestRestTemplate. We use this to send HTTP requests for our RESTful resource. Again, this is just like you would do in a typical Spring Boot 1.4 integration test.
Now take a look at the @Given, @When, @Then, and @And annotations: These define the methods implementing the steps. You can track them right back to the src/cucumber/resources/greetingsResource.feature file. Notice how we use simple regular expressions to map step input (fx caller values) to method parameters.
In case of errors, the steps throws ordinary java.lang.AssertionErrors via the awesome AssertJ library [6].
See? It almost looks like a normal Spring Boot integration test. One major difference is the need for storing intermediate state in the class itself (or somewhere else: fx a shared class). Well rest in the knowledge that any involved step classes, here GreetingsResourceSteps, are disposed after each Scenario. Said in another way: you have a fresh “steps” instance for each scenario.
You may also want to take a look at the @Before and @After cucumber annotations. They resemble the same from JUnit.
Step 4 of 5: Implement the feature being tested
Lastly, we get to the actual feature. It’s just the ordinary @RestController:
1
2
3
4
5
6
7
8
9
10
11
12
13
14
15
16
@RestController
public class GreetingsController {

  @GetMapping("/greetings/{caller}")
  public ResponseEntity<?> getGreeting(@PathVariable String caller) {

    if ("0xCAFEBABE".equalsIgnoreCase(caller)) {
      return new ResponseEntity<>(HttpStatus.I_AM_A_TEAPOT);
    }

    String greeting = String.format("Hello World, %s", caller);

    return new ResponseEntity<>(greeting, HttpStatus.OK);
  }

}
Ahem … I obviously wrote this controller after the Gherkin tests.
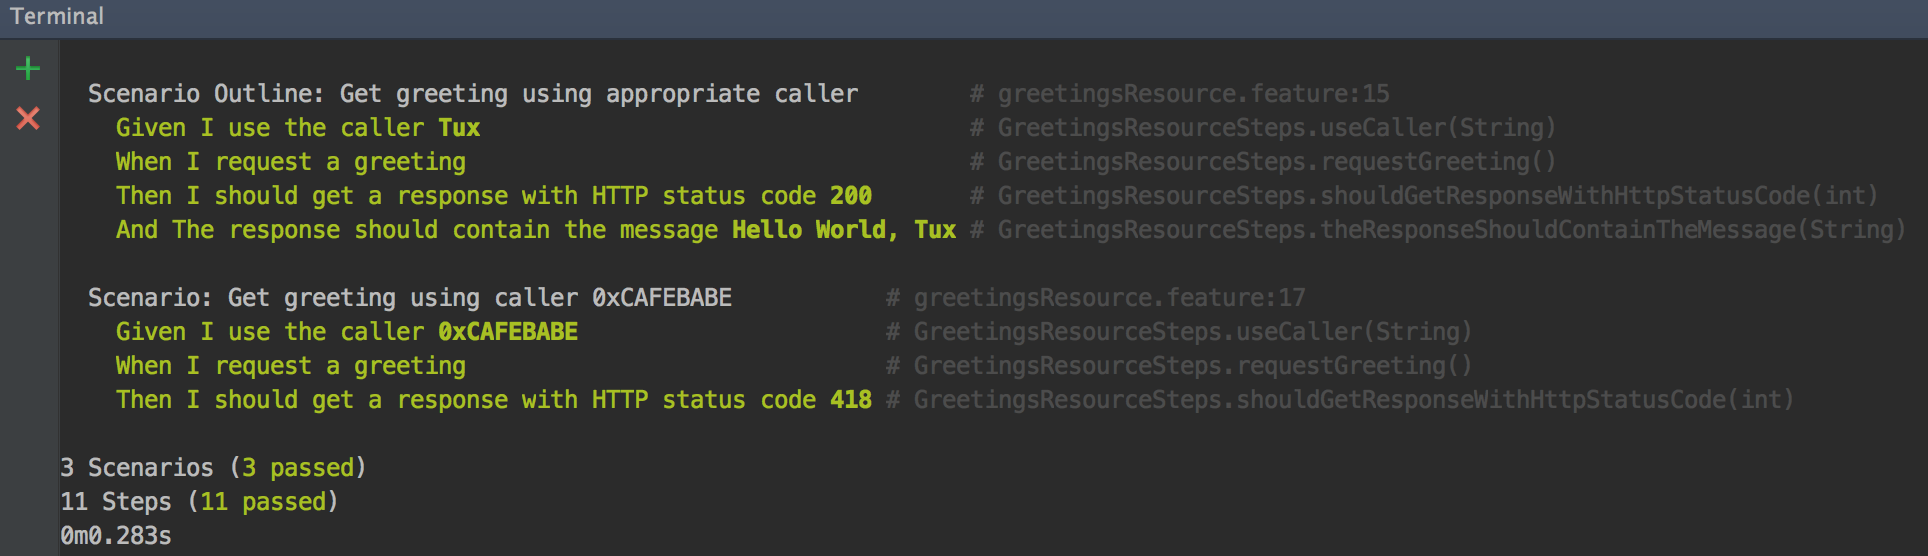
Step 5 of 5: Run the Gherkin tests and get the result
Thanks to the Gradle Cucumber Plugin, running the tests is a matter of:
./gradlew clean cucumber
Here is an example output:
And here is an example output from the HTML generated report at ./build/cucumber/html/index.html:

Using Jenkins as a CI server? You can find a bunch of cucumber plugins for that. Just point the plugins to your build/cucumber directory and you are good to go.
In retrospective
This example was all about testing a RESTful resource. But Gherkin style tests are not limited to that:
The Gherkin step implemention code could test anything. You could drive Selenium tests if you want to. Or Spring @Service beans. You decide.
The important thing is that it helps you and the business drive the right solution.
References
[1] Gherkin language
[2] Behavior-driven development (BDD) on Wikipedia
[3] Cucumber-JVM
[5] 418
[6] AssertJ